Penetrant Testing (PT)
Penetrant Testing (PT)
In general terms, penetrant testing reveals surface discontinuities by the bleedout of a penetrating medium against a contrasting colored background.
This is accomplished by applying a penetrant (usually liquid) to the cleaned surface of the test piece.
Once this penetrant is allowed to remain on the surface for a prescribed time (dwell time), it will be drawn into any surface opening by capillary action.
Subsequent removal of excess penetrant and application of a developer draws remaining penetrant from discontinuities.
The resultant indications are shown in high contrast and magnify the presence of the discontinuity so it can be visually interpreted.
There are two primary ways in which penetrant materials are grouped: specifically, the type of indication produced, and the method of excess penetrant removal.
The two penetrant indications are visible and fluorescent.
The visible dye (usually red) produces a vivid red indication against a white developer background when viewed under white light.
The fluorescent penetrant produces a greenish, fluorescent indication against a light background when observed under ultraviolet (black) light.
Since the human eye can more readily perceive a fluorescent indication than a visible indication, use of fluorescent penetrant can result in a more sensitive test.
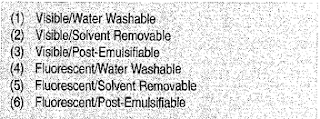
The second way in which penetrants are categorized refers to the method by which excess penetrant is removed from the test surface.
They can be water washable, solvent removable, or post-emulsifiable.
Water washable penetrants contain an emulsifier which allows the oily penetrant to be rinsed off the surface with a low pressure water spray.
Solvent removable penetrants require solvent to remove the surface penetrant from the test object.
Post-emulsifiable penetrants are removed by adding an emulsifier after the dwell time.
The application of this emulsifier to the penetrant on the test surface permits it to be removed with water in the same manner as the water washable type.
By combining the characteristics of these two classifications, six different types of penetrants can be produced:
With any of these types, the basic steps are essentially the same, except for post-emulsifiable penetrants which require an additional step to apply the emulsifier.
So, with any of the methods, there are four general steps to follow, making the test a relatively simple test to perform. However, even as simple as it appears, it is important that each of the steps be carefully performed in its proper sequence; otherwise, the test results will not be reliable.
The first step involved in performing penetrant testing is to thoroughly clean the surface of the test object. Since penetrant testing is used to reveal surface discontinuities, this step is extremely important.
If anything is blocking the surface opening of a discontinuity, it will prevent the penetrant from entering the opening; consequently, the discontinuity will not be revealed. The test object should be free of oil, dirt, rust, paint, etc.
When cleaning softer materials, such as copper or aluminum, care must be taken if the surface is cleaned using some mechanical technique like wire brushing or blast cleaning.
An aggressive mechanical cleaning operation might tend to smear the surface metal to cover an existing surface opening and prevent its discovery.


And it can be applied to nonmagnetic metals when other techniques are not applicable.
The process is also quite portable, especially the solvent removable type.
For this method, there are convenient aerosol cans of penetrant, developer, and cleaner which can be taken to virtually any test location.
Depending on the type of penetrant system being used, the equipment required may be very minimal, allowing the user to penetrant test without a significant capital expense as compared to other test methods.
Among the limitations of penetrant testing is the most prominent one-the fact that it will not detect subsurface discontinuities.
Also it is hindered because it is a relatively time-consuming test when compared to magnetic particle testing.
The surface condition of the part has a significant effect on the reliability of the test, so the cleaning required for certain applications may be extensive.
There is also a need for cleaning the test part after the testing is completed.
When testing rough, irregular surfaces, which are often present as the result of welding, the presence of nonrelevant indications may make interpretation difficult.
The equipment required to perform penetrant testing is relatively simple and may consist only of a penetrant, cleaner, lint-free rags, developer and, if required, an emulsifier.
A good white light source is required for visible dye penetrants and a good ultraviolet light source is required for fluorescent types.
In addition, fluorescent penetrant testing requires a darkened area to monitor cleaning and interpretationof test results.
A magnifying glass can also prove useful when very minute discontinuities are being evaluated.
Once an indication has been discovered, it can be permanently recorded using photography or sketches. The indication can also be lifted off the test surface and transferred to a test report form using a transparent plastic tape.
When using the PT method, it is imperative to remove all testing materials including excess penetrant, cleaner, and developer prior to welding.
Striking an arc on a surface containing these materials not only affects weld quality, but it can also result in the formation of noxious or even hazardous fumes which can create a serious safety hazard for personnel.
In general terms, penetrant testing reveals surface discontinuities by the bleedout of a penetrating medium against a contrasting colored background.
This is accomplished by applying a penetrant (usually liquid) to the cleaned surface of the test piece.
Once this penetrant is allowed to remain on the surface for a prescribed time (dwell time), it will be drawn into any surface opening by capillary action.
Subsequent removal of excess penetrant and application of a developer draws remaining penetrant from discontinuities.
The resultant indications are shown in high contrast and magnify the presence of the discontinuity so it can be visually interpreted.
There are two primary ways in which penetrant materials are grouped: specifically, the type of indication produced, and the method of excess penetrant removal.
The two penetrant indications are visible and fluorescent.
The visible dye (usually red) produces a vivid red indication against a white developer background when viewed under white light.
The fluorescent penetrant produces a greenish, fluorescent indication against a light background when observed under ultraviolet (black) light.
Since the human eye can more readily perceive a fluorescent indication than a visible indication, use of fluorescent penetrant can result in a more sensitive test.
The second way in which penetrants are categorized refers to the method by which excess penetrant is removed from the test surface.
They can be water washable, solvent removable, or post-emulsifiable.
Water washable penetrants contain an emulsifier which allows the oily penetrant to be rinsed off the surface with a low pressure water spray.
Solvent removable penetrants require solvent to remove the surface penetrant from the test object.
Post-emulsifiable penetrants are removed by adding an emulsifier after the dwell time.
The application of this emulsifier to the penetrant on the test surface permits it to be removed with water in the same manner as the water washable type.
By combining the characteristics of these two classifications, six different types of penetrants can be produced:

With any of these types, the basic steps are essentially the same, except for post-emulsifiable penetrants which require an additional step to apply the emulsifier.
So, with any of the methods, there are four general steps to follow, making the test a relatively simple test to perform. However, even as simple as it appears, it is important that each of the steps be carefully performed in its proper sequence; otherwise, the test results will not be reliable.
The first step involved in performing penetrant testing is to thoroughly clean the surface of the test object. Since penetrant testing is used to reveal surface discontinuities, this step is extremely important.
If anything is blocking the surface opening of a discontinuity, it will prevent the penetrant from entering the opening; consequently, the discontinuity will not be revealed. The test object should be free of oil, dirt, rust, paint, etc.
When cleaning softer materials, such as copper or aluminum, care must be taken if the surface is cleaned using some mechanical technique like wire brushing or blast cleaning.
An aggressive mechanical cleaning operation might tend to smear the surface metal to cover an existing surface opening and prevent its discovery.

Once the surface is suitably clean and has been allowed to dry7 the penetrant is applied.
On small parts this can be done by dipping them into a bath of penetrant. On larger parts, the penetrant can be applied by spraying or brushing.
The penetrant is allowed to remain on the test surface for a time period between 5 and 30 minutes, and this time is referred to as the dwell time.
The exact length of this dwell time depends upon the penetrant manufacturer’s recommendations, the temperature of the part, and the size of the discontinuities of concern.
The test surface must be kept moistened with penetrant during this entire time so that the penetrant can flow into surface openings.
Figure 10.16 shows the penetrant being applied to the test surface.


The penetrant is drawn into tight cracks by an action referred to as capillary action; this phenomena was previously discussed with regard to brazing filler metal being drawn into the braze joint.
Capillary action causes liquids to be drawn into tight clearances.
Following the prescribed dwell time, the surface of the test object is thoroughly and carefully cleaned of the excess penetrant.
Care must be taken to clean the surface sufficiently to prevent the occurrence of excessive penetrant background and other nonrelevant indications which may mask real indications and cause them to be missed.
However, this cleaning operation should not be so aggressive that it washes penetrant out of shallow discontinuities.
Figure 10.17 shows the proper procedure for removing excess penetrant.
Once the excess penetrant has been removed, a developer is applied.
It can be a dry powder or a powder suspended in a volatile liquid which readily evaporates, leaving the powder on the surface, It is important that the developer be applied in a thin, uniform layer.
In fact, a good technique is to apply the developer in several very thin layers, allowing a couple of minutes between successive developer applications to avoid excessive developer buildup.
A thick layer of developer can mask very small indications.
The sensitivity of the penetrant test is dependen upon the size of the developer powder particles as well as the thickness of the developer layer on the test surface.
Large particle size and thick layers of developer will tend to decrease the sensitivity of the penetrant test.
This developer draws penetrant out of any surface discontinuities to create a contrasting indication in much the same manner that an absorbent material soaks up liquid.
This “bleedout” magnifies tiny discontinuities to provide indications which can be easily seen.
The discontinuity indication can then be evaluated as to whether it is considered to be detrimental.
When using a visible dye penetrant, the evaluation is done under white light whereas use of fluorescent penetrants will require that the evaluation be performed using an ultraviolet (black) light in a darkened area.
Figure 10.18 illustrates how the visible indication is produced by the bleedout of the penetrant through the layer of developer.
There are numerous advantages which can be gained when using penetrant testing.
First, the use of penetrants is not limited to metallic test objects.
Any nonporous material can be tested for surface discontinuities in this manner. It is also well suited for evaluating weld or braze joints between dissimilar metals, which may present a problem for other test methods.

And it can be applied to nonmagnetic metals when other techniques are not applicable.
The process is also quite portable, especially the solvent removable type.
For this method, there are convenient aerosol cans of penetrant, developer, and cleaner which can be taken to virtually any test location.
Depending on the type of penetrant system being used, the equipment required may be very minimal, allowing the user to penetrant test without a significant capital expense as compared to other test methods.
Among the limitations of penetrant testing is the most prominent one-the fact that it will not detect subsurface discontinuities.
Also it is hindered because it is a relatively time-consuming test when compared to magnetic particle testing.
The surface condition of the part has a significant effect on the reliability of the test, so the cleaning required for certain applications may be extensive.
There is also a need for cleaning the test part after the testing is completed.
When testing rough, irregular surfaces, which are often present as the result of welding, the presence of nonrelevant indications may make interpretation difficult.
The equipment required to perform penetrant testing is relatively simple and may consist only of a penetrant, cleaner, lint-free rags, developer and, if required, an emulsifier.
A good white light source is required for visible dye penetrants and a good ultraviolet light source is required for fluorescent types.
In addition, fluorescent penetrant testing requires a darkened area to monitor cleaning and interpretationof test results.
A magnifying glass can also prove useful when very minute discontinuities are being evaluated.
Once an indication has been discovered, it can be permanently recorded using photography or sketches. The indication can also be lifted off the test surface and transferred to a test report form using a transparent plastic tape.
When using the PT method, it is imperative to remove all testing materials including excess penetrant, cleaner, and developer prior to welding.
Striking an arc on a surface containing these materials not only affects weld quality, but it can also result in the formation of noxious or even hazardous fumes which can create a serious safety hazard for personnel.


Honest reviews of the best welding helmets on the market. Comparisons, buying guides and much more. Make the right choice and get great discount! see this
ReplyDeleteAmong the many types of WeldingStars lens is the magnifying welding lens. This has been considered one of the great innovations in welding lenses.
ReplyDelete