Posts

Showing posts from August, 2011

links

Penetrant Testing (PT)
Image
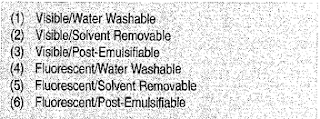
Penetrant Testing (PT) In general terms, penetrant testing reveals surface discontinuities by the bleedout of a penetrating medium against a contrasting colored background. This is accomplished by applying a penetrant (usually liquid) to the cleaned surface of the test piece. Once this penetrant is allowed to remain on the surface for a prescribed time (dwell time), it will be drawn into any surface opening by capillary action. Subsequent removal of excess penetrant and application of a developer draws remaining penetrant from discontinuities.  The resultant indications are shown in high contrast and magnify the presence of the discontinuity so it can be visually interpreted. There are two primary ways in which penetrant materials are grouped: specifically, the type of indication produced, and the method of excess penetrant removal.  The two penetrant indications are visible and fluorescent.  The visible dye (usually red) produces a vivid red indication against

Nondestructive Testing (NDT)

Nondestructive Testing (NDT) One of the purposes of an effective quality control program is to determine the suitability of a given base metal or a weld to perform its intended service. One way to judge that suitability is to subject the base metal or weld to destructive tests which would provide information about the performance of that test object. The major disadvantage of such an approach is that, as the name implies, the test object is destroyed in the process. Therefore, a number of tests have been developed to provide an indication of the acceptability of the test object without rendering it unusable for service. These various tests are referred to as nandestructìve tests, because they permit the nondestructive evaluation (NDE) of the metal or component. Even the destructive testing of a given percentage of parts can be expensive and assumes that the untested parts are of the same quality as those tested. Nondestructive tests yield indirect, yet still valid, results

Visual Inspection (VT)

Visual Inspection (VT) Since the welding inspector’s responsibilities can be extensive and will occur at various stages of the fabrication sequence, a helpful aid is an “inspection checklist.”  Such a document will help the welding inspector organize the inspection effort and assure each specific task has been performed.  An example of such a listing is shown in Figure Also, the various tools used by the visual welding inspector will be reviewed. While the visual inspection method is characterized as requiring a minimum of tools, there are certain devices which can help the welding inspector perform more easily and effectively.  Figure illustrates some of these tools which might be used by the welding inspector to aid in evaluating welds and weldments. It has been mentioned that the only way in which visual inspection can be considered to effectively evaluate the quality of welds is to apply that inspection at every step of the fabrication process. Unless there is an

Important Qualities of the Welding Inspector

Image
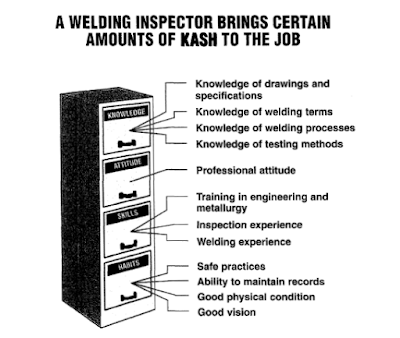
Important Qualities of the Welding Inspector The individual who does welding inspection should possess certain qualities to assure that the job will be done most effectively. Figure 1.2 illustrates these quali ties. The first, and perhaps the most important quality,is a professional attitude. Professional attitude is often the key factor for welding inspector success. Inspector attitude often determines the degree of respect and cooperation received from others during the performance of inspection duties. Included in this category is the ability of the welding inspector to make decisions based on facts so that inspections are fair, impartial and consistent.  If decisions are unfair or show partiality or inconsistency, they greatly affect the inspector’s credibility.  A welding inspector must be completely familiar with the job requirements so that decisions are neither too critical nor too lax.  It is a mistake for the inspector to have preconceived ideas as to

Who is the Welding Inspector ?

Who is the Welding Inspector? - Before turning our discussion to the technical subjects, let us talk about the welding inspector as an individual and the typical responsibilities that accompany the position. The welding inspector is a responsible person, involved in the determination of weld quality according to applicable codes and/or specifications. In the performance of inspection tasks, welding inspectors operate in many different circumstances, depending primarily for whom they are working. Thus, there is a special need for job specifications due to the complexity of some components and structures. The inspection workforce may include destructive testing specialists, nondestructive examination (NDE) specialists, code inspectors, military or government inspectors, owner representatives, in-house inspectors, and others.  These individuals may, at times, consider themselves “welding inspectors,”since they inspect welds as part of their job responsibility. The three gen

Gas welding using gas filler rod

Image
Gas welding using gas filler rod

How Arc Welding Works

Image
How Arc Welding Works

Disadvantages of Welding

Disadvantages of Welding  -  (i) Welding gives out harmful radiations (light) fumes arid spatter.  (ii) Welding results in residual stresses and distortion of the work pieces.  (iii) Jigs and fixtures are generally required to hold and position the parts to be welded.  (iv) Edge preparation of the workpieces is generally required before welding them.  (v) A skilled welder is a must to produce a good welding job. (vi) Welding heat produces metallurgical changes. The structure of the welded joint is not same as that of the parent metal.  (vii) A welded joint for many reasons, needs stress relief heat treatment.

Advantages of Welding

Advantages of Welding  - (i) A good weld is as strong as the base metal.  (ii) General welding equipment is not very costly.  (iii) Portable welding equipments are available.  (iv) Welding permits considerable freedom in design.  (v) A large number of metals/alloys both similar and dissimilar can be joined by welding. (vi) Welding can join workpieces through spots, as continuous pressure tight seams, end to end and in a number of other configurations.  (viii) Welding can be mechanized. 

Commonly Welded Base Metals

Commonly Welded Base Metals  -  Metals can be classified as 1. Ferrous 2. Nonferrous. Ferrous materials contain iron and the one element people use more than all others is Iron. Ferrous materials are the most important metals/alloys in the metal lurgical and mechanical industries because of their very extensive use. Ferrous materials finding day to day welding applications are: 1. Wrought Iron. 2. Cast Iron. 3. Carbon Steel (Low. Medium and High Carbon Steels). 4. Cast Steels. 5. Alloy Steels. 6. Stainless Steels, etc. Nonferrous materials are those that are not iron based. Like ferrous materials, nonferrous materials also find extensive industrial applications. Nonferrous materials finding day to day welding applications are : 7. Aluminium and its alloys. 8. Copper and its alloys. 9. Magnesium and its alloys. 10. Nickel and its alloys. 11. Zinc and its alloys, etc. 

Classification of Welding Processes

Classification of Welding Processes  - There are about 35 different welding and brazing processes and several soldering methods in use by industry today.There are various ways of classifying the welding and allied processes. For example, they may be classified on the basis of : (i) Source of heat, i.e., flame, arc, etc. (ii) Type of interaction i.e. liquid/liquid (fusion welding) or solid/solid (solid state welding). In general, various welding and allied processes are classified as follows: 1. Gas Welding Airacetylene Welding Oxyacetylene Welding Oxyhydrogen Welding  Pressure gas Welding 2. Arc Welding Carbon Arc Welding Flux Cored Arc Welding TIG (or GTAW) Welding Plasma Arc Welding Electroslag Welding and Electro gas Welding Stud Arc Welding. Shielded Metal Arc Welding Submerged Arc Welding MIG (or GMAW) Welding 3. Resistance Welding Spot Welding Seam Welding Projection Welding Resistance Butt Welding Flash Butt Welding Percussion Welding High Frequ

History of Resistance Welding

History of Resistance Welding  -Elihu Thomson, a Professor at Franklin Institute in Philadelphia, was the first to demonstrate the possibility of joining metals by resistance welding. His experiments which were completed in 1886, led to the very extensive, complex methods which are useful in the assembly of many of our modern structures.  Today multiple electrode machines are employed in high production units for completing hundreds of welds in fast moving production lines.At the present time, welding practice is divided into about 70% Arc welding with the balance divided between Resistance welding and Oxyacetylene welding. 

History of Arc Welding

History of Arc Welding . Electric arc was first described by Davy in England in the year 1809, but the beginning of arc welding could become possible only with the improvements in electric dynamos or generators between 1877 and 1880. Auguste de Meritens established arc welding process in 1881 which was applied to join certain components of electrical storage batteries. The joining of metals, using a carbon arc was suggested by Moissan (a Frenchman) in 1881, but it was only between 1885 and 1887 when, in Russia, Bernardos and Olszewski got patented and used single carbon arc welding for joining metals. In 1889 Zerener processed an idea, which aided later on to develop Twin Carbon arc welding. In 1892, in Germany, N.G. Slavianoff proposed the use of bare wire metallic electrodes for joining metals. The arc being unshielded in this case, satisfactory welds could not be produced. In 1907, in Sweden, Oscar Kjellberg got a patent for covered electrodes. The coating which he employed co

History of Gas Welding

History of Gas Welding  - The oxyacetylene process was an outgrowth of to discovery of Henry Louis Le Chatelier, a French chemist, who in 1895 showed that the combustion of acetylene with oxygen produced a flame having a temperature far higher than that of any gas flame previously known.  The commercial success of the oxyacetylene process, however, depended upon the availability of oxygen and acetylene in sufficient quantities to make the process practical. In the early 1900's torches of a practical type were introduced and by 1903 the oxyacetylene process began to be used industrially. 

Welding Technology Introduction

Welding Technology Introduction  - Welding is a process for joining different materials. The large bulk of materials that are welded are metals and their alloys, although the term welding is also applied to the joining of other materials such as thermoplastics.  Welding joins different metals/alloys with the help of a number of processes in which heat is supplied either electrically or by means of a gas torch. In order to join two or more pieces of metal together by one of the welding processes, the most essential requirement is Heat. Pressure may also be employed, but this is not, in many processes essential. The use of welding in today's technology is extensive. It had a phenomenal rise since about 1930; this growth has been faster than the general industrial growth. Many common everyday use items, e.g., automobile cars, aircrafts, ships, electronic equipment, machinery, household appliances, etc., depend upon welding for their economical construction. 

Ads